¶Always wash in the shade.
Microfiber towel care: wash with liquid detergent only, no fabric softener, tumble or air dry only, no heat.
Supplies:
· Optional: tent for shade*
· Mild alkaline presoak
· Presoak sprayer
· Pressure washer (recommended specs: 1800 psi maximum, 3 gal/min minimum)*
· Iron deposit remover
· Descaling agent
· Coating safe automotive hand washing soap
· 1 wash mitt
· 3-5 gal bucket with grit guard
· 1 wheel brush
· 1 primary drying towel
· 1 secondary drying towel
· Air compressor w/handle attachment, automotive blow dryer, or leaf blower*
· Tarminator
· 70% isopropyl alcohol(IPA) solution
· Tire dressing
· 2 window cleaning towels
· Glass cleaner
· ~15% isopropyl alcohol(IPA) panel wipe
· Coating specific topper
· 6 300+gsm closed loop microfiber towels
*Not included in Classic Supply Buckets
Directions:
Time Estimate: 2 hr 15 min – 4 hr 20 min
WASH
1. Optional (for best results): Mix and fill presoak sprayer and presoak entire exterior of vehicle including wheels, tires, and wheel wells. Just enough to wet the surface.
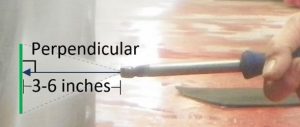
2. Pressure wash entire vehicle from the bottom up, so as to not rinse the soap away before the friction of the direct pressure washer blade reaches the surface, gaining the full benefit of the presoak lifting the dirt off the surface. Pressure wash from 3-6 inches away and perpendicular to the surface being pressure washed. Include the wheels, the barrel of the wheels, tires, wheel wells and the outer edges of the door jambs as necessary.
3. Spray on iron deposit remover on all exterior surfaces, excluding the windows, with spray bottle or foam sprayer.
4. Fill bucket (with a grit guard) with water and hand washing soap to the instructed dilution ratio, and soak wash mitt in bucket, do not wring out before using. With the wash mitt, hand wash the body from the top surfaces down; this will ensure the wash mitt does not get prematurely soiled, grinding and swirling dirt around from more contaminated surfaces to clearer ones. Work the lubricated wash mitt into every crack and crevasse of any intricate body trim, re-soak your wash mitt at least four times throughout this portion, and do NOT over scrub any contaminants & blemishes that to do not make a significant visual change after the first few light-to-medium pressure passes with the wash mitt. After hand washing the body, go over the front impact areas again and lightly re-rub any bug guts, most are water soluble and after soaking for some time will come off with relative ease, do not increase pressure while rubbing. Lastly, make one trip around the vehicle to hand wash the underside of both bumpers and rockers as well as the wheel well lips.
5. Thoroughly rinse all soap off with a pressure washer (12-18 inches away) or garden hose. **Most iron deposit removers are very clingy and you may notice the paint not beading as well, you may find it necessary to re-presoak and rinse to remove more of it, however any remaining residue will be removed while prepping for the ceramic topper**
6. Repeat steps 3-5 with descaling agent instead of iron deposit remover if water spots or other non-metallic contaminants remain
7. Spray an iron deposit remover on the wheels and tires with a spray bottle or foam sprayer, then re-pressure wash.
8. Roll the vehicle forward to rotate the wheels 180°, reapply iron deposit to the wheels and tires, and lightly scrub the barrels and faces with a wheel brush, then pressure wash again.
DRY
9. Gently drag primary drying towel across all exterior surfaces, top down. It is okay and good to leave it slightly damp for the next step. It is imperative that you move swiftly so that the smears and streaks do not dry completely.
10. Use your secondary drying towel with compressed air to push water out of panel breaks, seams, and trim, catching the excess water in your towel and removing smears on panels at the same time, once the towel is slightly damp. Again, work from the top down.
CHEMICAL DECONTAMINATION
11. Use a microfiber towel completely saturated with 70% IPA to remove any visible sap. Lightly wipe back and forth letting the alcohol slowly dissolve the sap, adding product often and as necessary. Let the chemical do the work.
12. Use a microfiber towel completely saturated with Tarminator to remove any visible tar on the lower portion of the vehicle. Lightly wipe back and forth letting the Tarminator slowly dissolve the tar, adding product often and as necessary. Let the chemical do the work.
FINISHING
13. Dress tires as necessary.
14. Two Towel Method Windows: fully saturate the waffle weave microfiber towel and scrub the window to be cleaned starting around the outside perimeter then the center, rubbing with firm pressure and in multiple directions. Use one portion of your dry terry cloth towel and dry following the same patterned used with the wet towel, flip to a new part of the towel and rub until there are no smears left. Move quickly to avoid smears completely air drying.
15. Wipe and dry the jambs, then wheels, with the same towels and method used on the windows until smear and spot free.
COATING TOPPING
16. Saturate one microfiber towel with an IPA based panel wipe and use it to wipe one panel at a time following immediately with a different clean and dry microfiber towel, wiping until smear free and moving then moving on to the next panel. This removes any remaining oils left onn the surface and facilitates the coating topper bonding with the existing coating. Repeat on all exterior surfaces, excluding windows.
17. Working one panel at a time, spray a fresh microfiber towel 2-3 times with coating topper and spray the panel to be worked on once. Wipe in product with application towel then wipe off with a clean and dry microfiber towel, use a light (flashlight and/or headlight) and many different angles to ensure complete smear removal before moving on to the next panel as any high spots left to cure may need to be polished off.
CLEAN UP
18. Clean, dry, and store products for future use.
19. Enjoy the unique feeling of pride that comes with creating and driving a clean and shiny vehicle!